

How To Change Contrast On Computer
This browser is no longer supported.
Upgrade to Microsoft Edge to take advantage of the latest features, security updates, and technical support.
- Feedback
- Edit
How to: Change fonts, colors, and themes in Visual Studio
- 6 minutes to read
Thank you.
You can change the fonts and the colors in Visual Studio in several ways. For example, you can change the default dark theme (also referred to as "dark mode") to a light theme, a blue theme, an extra-contrast theme, or a theme that matches your system settings. You can also change the default font and text size in both the IDE and the code editor.
Tip
See the We've upgraded the UI in Visual Studio 2022 blog post to learn more about the subtle color contrast ratio adjustments and a new Cascadia Code font we've added to make Visual Studio more accessible for everyone.
You can change the fonts and the colors in Visual Studio in many ways. For example, you can change the default blue color theme to the dark theme (also referred to as "dark mode"). You can also select an extra-contrast theme if that best suits your needs. And, you can change the default font and text size in both the IDE and the code editor.
Change the color theme
Here's how to change the color theme of the IDE frame and the tool windows in Visual Studio.
-
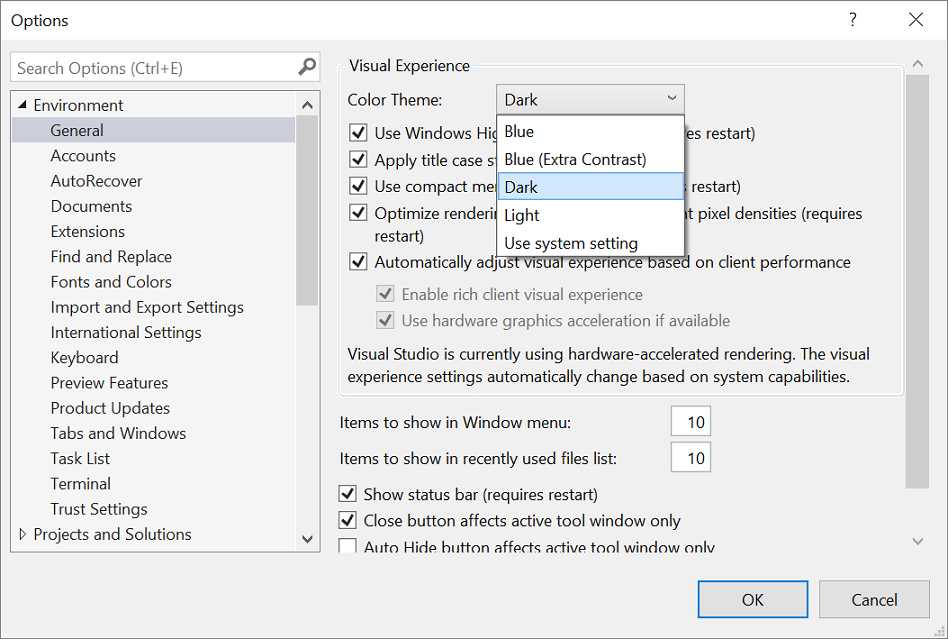
On the menu bar, choose Tools > Options.
-
In the options list, choose Environment > General.
-
In the Color theme list, choose either the default Dark theme, the Light theme, the Blue theme, or the Blue (Extra Contrast) theme.
You can also choose to use the theme that Windows uses by selecting Use system setting.
Note
When you change a color theme, text in the IDE reverts to the default or previously customized fonts and sizes for that theme.
-
On the menu bar, choose Tools > Options.
-
In the options list, choose Environment > General.
-
In the Color theme list, choose either the default Blue theme, the Light theme, the Dark theme, or the Blue (Extra Contrast) theme.

Note
When you change a color theme, text in the IDE reverts to the default or previously customized fonts and sizes for that theme.
Change fonts and text size
You can change the font and text size for all the IDE frame and tool windows, or for only certain windows or text elements. You can also change the font and text size in the editor, too.
To change the font and text size in the IDE
-
On the menu bar, choose Tools > Options.
-
In the options list, choose Environment > Fonts and Colors.
-
In the Show settings for list, choose Environment.

Note
If you want to change the font for tool windows only, in the Show settings for list, choose All Text Tool Windows.
-
Modify the Font and Size options to change the font and text size for the IDE.
-
Select the appropriate item in Display items, and then modify the Item foreground and Item background options.
-
On the menu bar, choose Tools > Options.
-
In the options list, choose Environment > Fonts and Colors.
-
In the Show settings for list, choose Environment.

Note
If you want to change the font for tool windows only, in the Show settings for list, choose All Text Tool Windows.
-
Modify the Font and Size options to change the font and text size for the IDE.
-
Select the appropriate item in Display items, and then modify the Item foreground and Item background options.
To change the font and text size in the editor
-
On the menu bar, choose Tools > Options.
-
In the options list, choose Environment > Fonts and Colors.
-
In Show settings for list, select Text Editor.

-
Modify the Font and Size options to change the font and text size for the editor.
-
Select the appropriate item in Display items, and then modify the Item foreground and Item background options.
-
On the menu bar, choose Tools > Options.
-
In the options list, choose Environment > Fonts and Colors.
-
In Show settings for list, select Text Editor.

-
Modify the Font and Size options to change the font and text size for the editor.
-
Select the appropriate item in Display items, and then modify the Item foreground and Item background options.
For more information, see the Change fonts and colors for the editor page.
Accessibility options
There are font options and color themes for you if you're neurodiverse or experience low vision, as follows:
- You can use the Cascadia Code font, which adds more weight to the proportions of letters, numerals, and characters to help disambiguate them. Cascadia Code also includes coding ligatures.
- You can choose to use a high-contrast color theme for all the apps and UI on a computer, or an extra-contrast color theme for Visual Studio only.
Use the Cascadia Code font
The new Cascadia Code font includes Cascade Mono, which is the default font in Visual Studio 2022. Not only are both of these fonts easier to read, but the Cascadia Code font also includes coding ligatures that turn a sequence of characters into a glyph. Coding ligatures, or glyphs, make it easier for people to cognitively associate the meaning behind them.
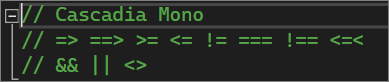
The following screenshot shows an example of the default Cascadia Mono font and lists a series of characters, to include mathematical symbols, that you might find yourself using while you code.
The following screenshot shows an example of the Cascadia Code font, where the same series of characters shown previously are now converted to coding ligatures, or glyphs.
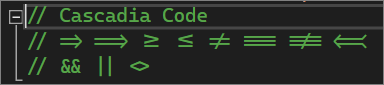
Notice that the last line of text in the Cascadia Code screenshot shows how the space between duplicate characters is reduced, which also makes them easier to read.
Here's how to toggle between the Cascadia fonts:
-
Go to Tools > Options > Environment > Fonts and colors.
-
From the Font dropdown list, select either the Cascadia Code font or the Cascadia Mono font you want, and then select OK.

There are color theme options for you if you experience low vision. You can use a high-contrast option for all the apps and UI on a computer, or an extra contrast option for Visual Studio only.
Use Windows high contrast
Use either of the following procedures to toggle the Windows high contrast option:
-
In Windows or in any Microsoft application, press the Left Alt+Left Shift+PrtScn keys.
-
In Windows, choose Start > Settings > Ease of Access. Then, under the Vision section in Windows 10 and later, choose High contrast.
Warning
The Windows high contrast setting affects all applications and UI on the computer.
Use Visual Studio extra contrast
Use the following procedures to toggle the Visual Studio extra contrast option:
-
On the menu bar in Visual Studio, choose Tools > Options, and then, in the options list, choose Environment > General.
-
In the Color theme drop-down list, choose the Blue (Extra Contrast) theme, and then choose OK.
To learn more about other Visual Studio accessibility options available to you, see the Accessibility features of Visual Studio page.
Tip
If there is an accessibility option for colors or fonts that you think might be useful but isn't currently available in Visual Studio, please let us know by selecting Suggest a feature in the Visual Studio Developer Community. For more information about this forum and how it works, see the Suggest a feature page.
Next steps
To learn more details about all the user interface (UI) elements for which you can change font and color schemes, see the Fonts and Colors, Environment, Options Dialog Box page.
See also
- How to: Change fonts and colors for the editor in Visual Studio
- Features of the Visual Studio code editor
- Personalize the Visual Studio IDE and the editor
Feedback
How To Change Contrast On Computer
Source: https://docs.microsoft.com/en-us/visualstudio/ide/how-to-change-fonts-and-colors-in-visual-studio
Posted by: youngerthearn1956.blogspot.com
0 Response to "How To Change Contrast On Computer"
Post a Comment